Saturday, 20 July 2024

How to Connect to your Linux based EC2 Instance from you local


Downloading a Key from AWS

When you create a new EC2 instance by using the wizard in AWS Management Console, a key pair is generated at the end of the EC2 instance creation process. A key pair consists of a private key and a public key. Secure Shell (SSH) is the encryption protocol, and the key pair is used to asymmetrically encrypt the connection. A public key can be generated by using the private key. When a key pair is generated for an Amazon EC2 instance, the public key is saved in the configuration of Linux installed on the EC2 instance, and the private key is downloaded by the user.

You must download the private key at the final step of the Amazon EC2 instance creation process and save the key in a safe place. The EC2 instance won’t be created until you download the private key. The private key is provided in a PEM file. Keep in mind that this is your only chance to download the key for the current AWS EC2 instance.

Saving the key required to connect to an AWS EC2 instance to finish creating the instance

I download the private key and save the key as the blog01-key.pem file.

Connect to EC2 Instance via SSH Using PuTTY

PuTTY is a free SSH client that you can install on Windows. You must convert the downloaded PEM file to a PPK file format, which is supported by PuTTY, before you can connect to AWS via SSH. For this reason, you need to use the PuTTY Key Generator (PuTTYgen) utility, which is installed with PuTTY from a single installation file. You can also download puttygen.exe manually. PuTTYgen is used to generate RSA and DSA keys.

As a result, I have three files on the Windows machine from which I am going to connect to EC2 instances:

blog01-key.pem

putty.exe

puttygen.exe

These files are located in “C:\AWS SSH\” in this example.

How to connect to AWS instances via SSH – preparing the needed files

Open PuTTY Key Generator (PuTTYgen) by clicking the puttygen.exe file or a shortcut to this file.

Click Load in the PuTTYgen window.

SSH Amazon EC2 key conversion in PuTTYgen

Click Select All Files (*.*) and browse the PEM file. We select “C:\AWS SSH\blog01-key.pem“. Then click Open.

Loading a key for AWS SSH conversion and configuration

Read the displayed notice and hit OK.

SSH Amazon EC2 key import

Now you can see the string of your public key in the window of PuTTYgen. Use the configuration as displayed on the screenshot below.

Type of key to generate: RSA

Number of bits in a generated key: 2048 bit

Click Save private key.

How to connect to an AWS instance via SSH – saving a converted key

Are you sure you want to save this key without a passphrase to protect it?

Hit Yes if you agree. If you don’t agree, go back and protect the key with a passphrase.

Saving a key needed for AWS SSH configuration

Save the private key to a safe location. I save the key as “C:\AWS SSH\AWS EC2 SSH.ppk“. Hit Save.

Saving the AWS EC2 SSH key file in the ppk format

How To SSH into EC2 Instance from Windows

Check the public IP address of your AWS EC2 instance. The instance must be in the running state to have a public IP address. In my case, the public IP address is 52.55.222.44. I will use this IP address for connecting to AWS via SSH.

Checking the public IP address of the EC2 instance

Open PuTTY in Windows. Run putty.exe or the appropriate shortcut.

Go to SSH > Auth.

Click Browse and select the PPK file (the private key). I select the “C:\AWS SSH\AWS EC2 SSH.ppk” file generated in PuTTYgen earlier.

Connect to EC2 instance SSH PuTTY

Go back to the Session screen in PuTTY and enter the public IP address of your EC2 instance in the Host Name (or IP address) field. Ensure that the connection type is SSH. I enter 52.55.222.44, which is the IP address of my EC2 instance copied from the EC2 Management Console. TCP port 22 is selected. Hit Open.

Connecting to an AWS EC2 instance via SSH in PuTTY

The security alert is displayed. Read the message and hit Accept to continue and connect to the EC2 instance. This dialog is displayed when you connect to a particular remote machine for the first time. The fingerprint displayed in the message must match the fingerprint of the EC2 instance.

Establishing the SSH connection with a Linux instance (SSH Amazon EC2)

Enter the user name in the console window. As I use Ubuntu Linux on my EC2 instance, I use ubuntu, which is the default user name configured for this instance deployed from the appropriate Amazon Machine Image (AMI).

Default user names for different types of Linux AMIs in AWS:

  • Amazon Linux 2 or the Amazon Linux AMI: ec2-user
  • CentOS: centos or ec2-user
  • Debian: admin
  • Fedora: fedora or ec2-user
  • Red Hat Enterprise Linux (RHEL): ec2-user or root
  • SUSE: ec2-user or root
  • Ubuntu: ubuntu
  • Oracle: ec2-user
  • Bitnami: bitnami

Once you see the command prompt of a Linux shell (bash in this case), you can run commands on the remote Linux machine running in AWS. This means that you’ve set the proper AWS EC2 SSH configuration in PuTTY.

Connect to EC2 instance SSH ubuntu

Transferring files via SSH to Amazon EC2 instances

I have configured remote AWS SSH access to the EC2 instance, and now I can connect to AWS instances via SSH, run commands, edit configuration, etc. However, you may also need to transfer files via SSH to AWS instances from your Windows machine or in the other direction. There are file transfer protocols that work over SSH to transfer files securely from one machine to another, for example, Secure File Transfer Protocol (SFTP) and Secure Copy Protocol (SCP).

To transfer files via SSH to AWS instances from Windows, you can use WinSCP, which is a free tool for Windows. Note that scp must be installed on the remote Linux machine running in AWS.

Once you have installed WinSCP on the Windows machine, run the application.

Select SFTP as the file protocol and, in the Host name field enter the public IP address of your EC2 instance to which you want to connect via SSH to transfer files. Enter a user name for your EC2 instance. I use 52.55.222.44 as the IP address and ubuntu as the user name in my example.

Click Advanced in the main window of WinSCP.

How to enable transferring files via SSH to AWS EC2 instances

Go to SSH > Authentication in the Advanced Site Settings window. Click  in the Authentication parameters section and select the private key you previously generated in PuTTYgen. In my case, I select “C:\AWS SSH\AWS EC2 SSH.ppk“. Hit OK to save the settings and go back to the main window of WinSCP.

Selecting the AWS EC2 SSH key for connecting to AWS instances in WinSCP

Click Login in the main window of WinSCP.

How to transfer files via SSH to an AWS instance in WinSCP

A warning message appears as it did when connecting to the EC2 instance from PuTTY for the first time. Hit Yes to continue.

Connecting to AWS via SSH – displaying connection details

If the AWS EC2 SSH configuration is correct, and you set the SSH connection parameters in WinSCP successfully, you can see the window with two panes in the commander style. The user folder of the local Windows machine is displayed in the left pane, and the user home folder of Linux running in AWS is displayed in the right pane. You can drag and drop files from one pane to another and copy, rename, or delete files on the local and remote machines.

Transferring files via SSH to an AWS instance is working now

Connecting to AWS via SSH from Linux

Unlike Windows, Linux has a native SSH client. In the console of your local Linux machine, use the command like the following for connecting to AWS EC2 instances running Linux via SSH:

ssh -i file_name.pem ubuntu@ip_address

Go to the directory where your private key .pem file is located on a Linux machine. In this example, I use Ubuntu, and I downloaded the blog01-key.pem file to ~/Downloads/.

cd ~/Downloads/

ssh -i blog01-key.pem ubuntu@52.55.222.44

Where ubuntu is the user name on the remote Linux machine, and 52.55.222.44 is the IP address of the remote Linux machine.

If you run this command now, you would get the error:

Warning: Unprotected private key file.

Permissions for ‘blog01-key.pem’ are too open.

It is required that your private key is not accessible by others.

This private key will be ignored. Load key: pad permission.

Permission denied (publickey).

SSH Amazon EC2 – connecting from Linux to a remote EC2 instance

You need to set lower (stricter) permissions for security reasons.

chmod 400 ./blog-key.pem

Use 400 if the keys must be only readable by you.

Use 600 if you need the keys to be readable and writable by you.

Now you can connect to AWS EC2 instances via SSH from your Linux machine with the command:

ssh -i blog01-key.pem ubuntu@52.55.222.44

Now I am connected via SSH to an Amazon EC2 instance.

How to connect to EC2 instance via SSH (Linux)

Transferring files via SSH to Amazon EC2 in Linux

You can also transfer files via SSH to AWS instances by using SCP in Linux. Make sure you have already established an AWS SSH connection to the remote Linux instance from your local Linux machine. Then, open a new console on your local Linux machine and connect to the EC2 instance by using the command like:

scp -i /path/key_name.pem /path/file_name.txt user_name@ec2_instance_IP_address:/path_to_file

In my example, I use the command:

scp -i ~/Downloads/blog01-key.pem ~/Downloads/file.txt ubuntu@52.55.222.44:/home/ubuntu

Transferring files via SSH to the AWS instance in the Linux console

Transferring files via SSH to the AWS instance has been completed successfully.

Transferring files via SSH to the AWS instance in the Linux console has finished

In order to copy a file in the reverse direction (from Linux in AWS EC2 to your local Linux machine), use the command like:

scp -i /path/key_name.pem user_name@ec2_instance_IP_address:/path_to_file/my-file.txt path/my-file2.txt

In my case, I use the command:

scp -i ~/Downloads/blog01-key.pem ubuntu@52.55.222.44:/home/ubuntu/file1.txt ~/Downloads/file1-copy.txt
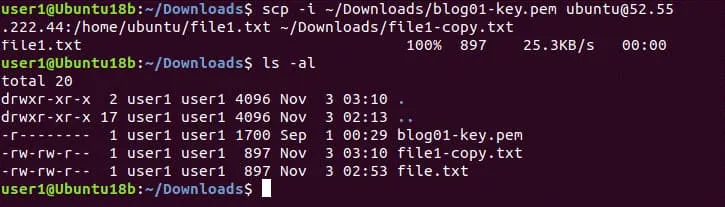
How to copy files from an EC2 instance via SSH in Linux

As you see in the screenshot, the file has been copied successfully. You can copy important files from an Amazon EC2 instance to the needed local computer and back up the files. Perform AWS EC2 backup regularly to avoid data loss.

How to Add a New Key to an AWS Instance

You can create an additional key pair for an existing EC2 instance for connecting to AWS instances via SSH after you create the AWS EC2 instance. You may need to do this for providing SSH access to the EC2 instance for other users. When you think that the user doesn’t need to connect via SSH into AWS instances, you can delete the public key from the Linux machine running in AWS EC2 without the need to recreate a new key instead of the key generated at the moment of instance creation.

Open EC2 Management Console in AWS Management Console.

Go to Network & Security in the navigation pane and click Key Pairs.

All existing key pairs are displayed on this page. You can type a part of an existing key pair name in the search field to find the key pair.

Click the Create key pair button in the top right corner of the web interface to create a new key pair for an existing EC2 instance.

AWS EC2 SSH connection – creating an additional key pair

Select .pem as the private key format if you need to use a key in Linux with OpenSSH or select .ppk if you need to use the key in Windows with PuTTY. As I’m going to use a local Linux machine for connecting to AWS EC2 instances via SSH with a new key, I select the .pem key option. You can add tags if needed. Hit Create key pair when ready to continue.

Creating a new key pair to connect to AWS EC2 instances

Save the downloaded file in a safe place. In my case, the name of the downloaded file is blog02-temp.pem and I save this file to the Downloads directory in the home user directory.

Saving the pem key file

Retrieving a public key from the new key pair

We have generated a new key pair in the web interface of AWS Management Console. Now we need to generate a public key by using a private key from the downloaded .pem file.

Use the command of this format:

ssh-keygen -y -f /path_to_key_pair/my-key-pair.pem

In my case, the command is:

ssh-keygen -y -f ~/Downloads/blog02-temp.pem

If you get an error, set the correct permissions:

chmod 400 ~/Downloads/blog02-temp.pem

If everything is correct, a generated public key is displayed in the console output.

Generating a public key by using a private key for connecting via SSH into AWS instances

Copy the generated key string and save this information in a safe place. In this example, I save the key string to a text file.

Copy the key string to the clipboard.

Connect to EC2 instances via SSH from your local Linux machine as explained above in this post.

We are located in /home/Ubuntu/ now.

Open the configuration file where public keys to access the EC2 instance via SSH are stored with a text editor:

nano ~/.ssh/authorized_keys

The full path to this configuration file depends on the Linux Amazon Machine Image (AMI) and can be:

/home/ubuntu/.ssh/authorized_keys

/home/ec2-user/.ssh/authorized_keys

/root/.ssh/authorized_keys

Paste your key from the clipboard to the second line in this configuration file.

Save changes and close the file.

AWS SSH configuration – adding a public key to a Linux machine running in AWS EC2

Don’t close the console (terminal) with the current SSH session that you use for connection to the EC2 instance until you ensure that the second key you have added works. Otherwise, you can lose SSH connection if the configuration is incorrect without the ability to connect to AWS instances via SSH. Don’t lock yourself out in case of a mistake!

Open another terminal on your local Linux machine and try to connect to the instance by using a new key. I go to the directory where my .pem key files are located.

cd ~/Downloads/

Preparing to check the SSH connection to an AWS EC2 instance with the second key pair

Connect to the EC2 instance running Linux in AWS from your local Linux machine in the new console by defining the new private key (blog02-temp.pem in this case).

ssh -i blog02-temp.pem ubuntu@52.55.222.44

SSH Amazon EC2 – the SSH connection with an additional key pair is established

AWS SSH connection has been established successfully with the new key. Now you can send the new key (blog02-temp.pem) to a user who needs to establish the AWS SSH connection. When you will need to disable SSH access to this AWS EC2 instance for the user, delete the second line from .ssh/authorized_keys on your remote Linux instance running in AWS EC2. Since the AWS SSH configuration with both keys (the first key that was generated when you created the EC2 instance and the second key you created before for another user to connect to AWS EC2) works fine, you can close the SSH terminal windows.

If you delete a key pair in Network & Security > Key pairs from the EC2 Management Console (the place where we created the second key in the web interface of AWS Management Console), keys inside the particular EC2 instance are not deleted.

What to Do if You Lose the AWS EC2 SSH Key

If you lose the private key for connecting to an AWS EC2 instance (that was generated when creating a new EC2 instance), you can no longer connect to the appropriate instance. You cannot generate a new key and insert the new key to the AWS SSH configuration file in the current EC2 instance. In this situation, you can use a temporary EC2 instance to which you have SSH access. Try the following workflow to restore AWS EC2 SSH access to the instance.

  • Stop the original EC2 instance, the AWS SSH private key to which you have lost.
  • Check information about EBS volumes attached to the EC2 instance. You need to identify the EBS volume that contains the root / volume mounted to Linux. Note the volume ID of this EBS volume.
  • Launch a temporary instance in AWS EC2. You can use the instance running the same Linux distribution as installed on the original machine (the AMI of the same type).
  • Generate a new key pair connecting to AWS in AWS Management Console. Save the private key and prepare the public key. You need to generate the key string of the public key to repair the AWS SSH configuration stored on the root volume used by the original instance.
  • Create a directory in Linux running on the temporary EC2 instance and mount the EBS volume that contains the root / partition of the original EC2 instance to the temporary EC2 instance. Locate the needed EBS volume by the volume ID you noticed before.
  • Open the AWS SSH key configuration file (that was located in a directory like /home/Ubuntu/.ssh/authorized_keys). The path is changed depending on the directory to which you mounted the root partition of the original EC2 instance. Add the key string of the new public key to the AWS SSH key configuration file.
  • Unmount the EBS volume used by the original EC2 instance that is attached to the temporary EC2 instance.
  • Mount the EBS volume that contains the edited AWS SSH key configuration file back to the original EC2 instance.
  • Power on the original EC2 instance and connect to this instance by using a new key pair via SSH.

Using EC2 Instance Connect

Key management is an important part of AWS administration because you need to keep AWS EC2 SSH keys for accessing EC2 instances in a safe place and also prevent losing them. Creating and deleting keys needed for temporary access of other users can be a routine task with a large number of users. For this reason, Amazon provides the ability to connect to AWS EC2 instances via SSH by using EC2 Instance Connect. This feature allows you to automate SSH key management for connecting to AWS instances.

The idea of using EC2 Instance Connect is that you create Identity & Access Management (IAM) policies to control AWS SSH access to EC2 instances centrally without the need to manage (create, share, delete) SSH keys manually. Finally, users can use an SSH client, a browser-based client of AWS EC2 console, or Amazon EC2 Instance Connect CLI for connecting to AWS EC2 instances.

The Amazon Instance Connect API pushes a one-time-use public SSH key to the instance metadata for 60 seconds. The IAM policy associated with the IAM user authorizes the user. The user must connect to the EC2 instance by using this key within 60 seconds. After the key expires, a new key must be used.

Amazon Instance Connect is supported for EC2 instances on which Ubuntu 16 (or higher) and Amazon Linux 2 are installed. Amazon Instance Connect must be installed on the EC2 Linux instance. Another prerequisite is the installation of AWS CLI on the remote Linux machine running in AWS.

After installation, EC2 Instance Connect executes the script that writes data to these parameters in the configuration file (/etc/ssh/sshd_config) of the SSH server daemon:

AuthorizedKeysCommand

AuthorizedKeysCommandUser

The updated AuthorizedKeysCommand configuration is used to read public AWS EC2 SSH keys from EC2 instance metadata. If custom values have been already entered for these parameters, Instance Connect doesn’t update (overwrite) them, but you cannot use the feature in this case.

You need to create a configuration file in JSON format. Open IAM Console, then go to Policies and hit Create Policy. As an alternative, you can use the command-line interface on your Linux machine with AWS CLI installed. The configuration example is displayed below. This policy can identify instances by the instance ID to allow access.

{

    “Version”: “2021-10-17”,

    “Statement”: [

      {

        “Effect”: “Allow”,

        “Action”: “ec2-instance-connect:SendSSHPublicKey”,

        “Resource”: [

            “arn:aws:ec2:region:account-id:instance/i-00000000000000000”,

            “arn:aws:ec2:region:account-id:instance/i-00000000000000001”

        ],

        “Condition”: {

            “StringEquals”: {

                “ec2:osuser”: “ami-username”

            }

        }

      },

      {

        “Effect”: “Allow”,

        “Action”: “ec2:DescribeInstances”,

        “Resource”: “*”

      }

    ]

}

Then the policy must be activated. The AWS CLI command to activate the policy will look something like this:

aws iam create-policy –policy-name my-policy –policy-document file://JSON-file-name

You can attach the activated policy to the appropriate user.

aws iam attach-user-policy –policy-arn arn:aws:iam::account-id:policy/my-policy –user-name IAM-friendly-name

In order to connect to the EC2 instance in Amazon EC2 Console, select the needed EC2 instance, and hit the Connect button. On the Connect to instance page, select the EC2 Instance Connect tab and hit Connect.

How to connect to AWS EC2 instances with EC2 Instance Connect

Conclusion

Connecting to AWS EC2 instances via SSH is an important part of the AWS EC2 administration process. This blog post explained how to make an AWS EC2 SSH configuration and connect to AWS EC2 instances running Linux from local Linux and Windows machines. Key pairs must be used to establish the SSH connection with EC2 instances. A public key is stored in the configuration of Linux running in AWS EC2 and a private key is used by a local SSH client installed on a user’s machine. Keep keys in a safe place and make backups regularly to avoid losing data, time, and costs.

Elastic IP


What is an Elastic IP in AWS?

An Elastic IP address is a static, public IPv4 address designed for dynamic cloud computing. It is associated with your AWS account, and you can allocate it to any instance within a particular region. Unlike traditional static IP addresses, an Elastic IP address can be dynamically remapped among your instances, allowing you to quickly recover from instance failures and reconfigure your applications without DNS changes.

Key Features:

  • Static IP Address: It remains the same, allowing for consistent access.
  • Flexible Reassignment: You can reassign it to different instances within the same AWS region, making it easier to handle instance failures.
  • Elasticity: Provides better availability by allowing you to mask instance or Availability Zone failures by rapidly remapping your public IP addresses to any instance in your account.

Use Cases:

  • Replacing failed instances: If an instance fails, you can quickly remap the Elastic IP address to another instance.
  • Avoiding DNS changes: By using Elastic IP addresses, you avoid the need to update your DNS records every time you launch a new instance.

What is Reverse Billing in AWS?

Reverse billing in the context of AWS typically refers to a pricing model where charges are borne by the service provider rather than the service consumer. This concept is more common in telecom services where the called party pays for the call (reverse charge or collect call). In AWS, reverse billing isn’t explicitly defined, but the concept can loosely apply to scenarios like:

  • Cross-Account Billing: Where one AWS account pays for resources used by another account, often managed through AWS Organizations.
  • Cost Allocation: Assigning costs of shared resources to different departments or projects within an organization.

How Elastic IPs and Billing are Associated

  1. Elastic IP Address Charges:

    • Free Usage: AWS provides one Elastic IP address associated with a running instance at no additional charge.
    • Chargeable Usage: You incur charges when:
      • The Elastic IP address is not associated with a running instance.
      • You have more than one Elastic IP address associated with an instance.
      • Elastic IP address remaps exceed 100 per month.
  2. Reverse Billing Context:

    • In AWS, the account that owns the Elastic IP address is billed. This can be particularly relevant in scenarios where multiple accounts are involved, such as in a multi-account architecture managed through AWS Organizations.
    • Cost Allocation Tags: You can use cost allocation tags to track and allocate Elastic IP costs to different projects or departments within your organization, effectively implementing a form of reverse billing.

Example Scenario

Elastic IP Usage and Billing:

  • You have an application running on EC2 instances that requires a static IP address for external communication. You allocate an Elastic IP address and associate it with an instance. If the instance fails, you reassign the Elastic IP to another instance to ensure continuity. AWS charges apply based on whether the Elastic IP is attached to a running instance or not.

Cross-Account Billing:

  • You have a central AWS account managing networking resources, including Elastic IPs. Multiple AWS accounts under your organization use these Elastic IPs. The central account receives the billing, but costs are tracked and allocated to the respective accounts or projects using cost allocation tags.

By understanding Elastic IP addresses and their associated billing, you can manage your AWS resources more effectively, ensuring high availability and cost efficiency.

How to Create an Admin User in AWS from the Root Account

 Creating an admin user in AWS from the root account involves several steps. The root account has unrestricted access, so it's a best practice to create an IAM user with administrative privileges and use that account for everyday tasks, reserving the root account for account and service management.

Here’s a step-by-step guide to creating an admin user:

Step 1: Sign in to the AWS Management Console as the Root User

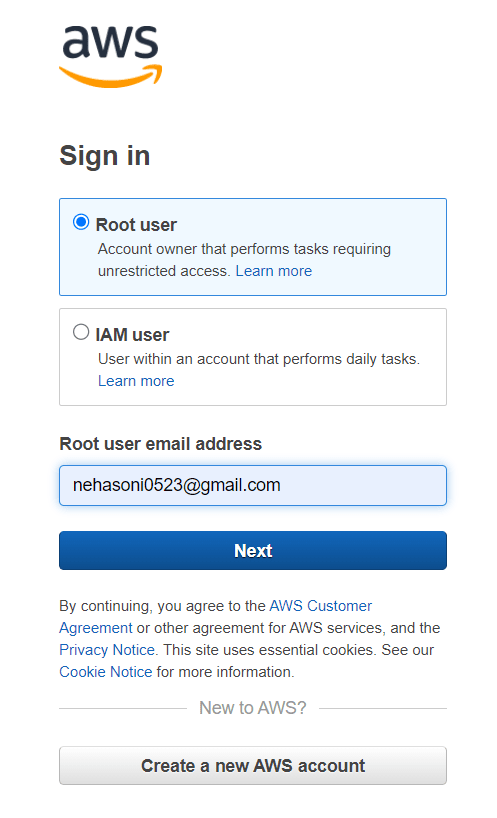
  1. Go to the AWS Management Console.
  2. Sign in with your root account credentials (email and password).

Step 2: Navigate to the IAM Service

  1. In the AWS Management Console, on the top right, click on your account name.
  2. In the dropdown menu, select “Security credentials.”
  3. In the left sidebar, click on “Users” under the “Access management” section.

Step 3: Create a New User

  1. Click the "Add user" button.
  2. Enter a user name for the new user. For example, "AdminUser."
  3. Select the checkbox for “AWS Management Console access” to enable console access for the user.
  4. Choose the “Custom password” option and enter a strong password. Optionally, select “Require password reset” for the user to reset their password upon first sign-in.

Step 4: Set Permissions for the New User

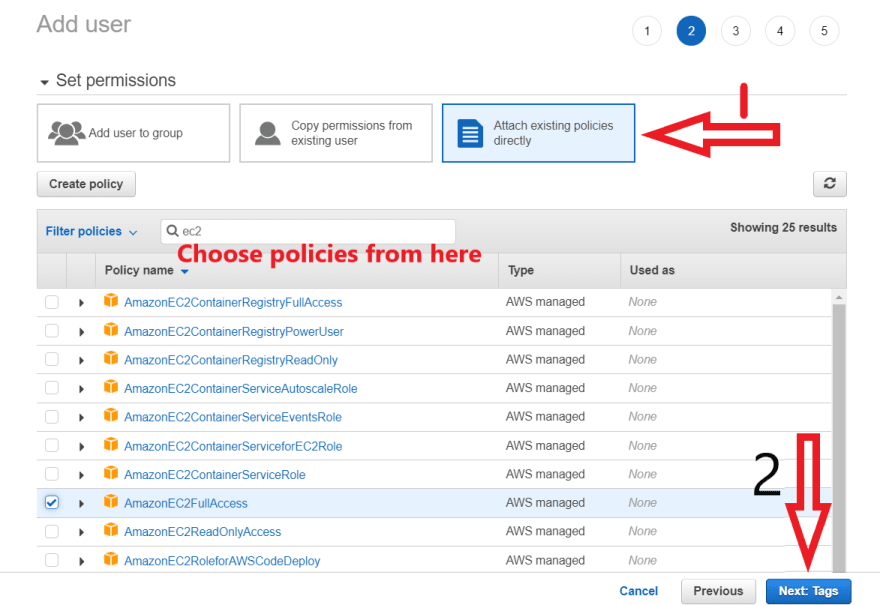
  1. On the “Set permissions” page, select “Attach existing policies directly.”
  2. In the search box, type “AdministratorAccess.”
  3. Check the box next to “AdministratorAccess” to assign full administrative permissions to the new user.
  4. Click the "Next: Tags" button.

Step 5: Add Tags (Optional)

  1. You can add tags to organize and manage your AWS resources. For example, you can add a tag with the key "Department" and the value "IT."
  2. Click the "Next: Review" button.

Step 6: Review and Create the User

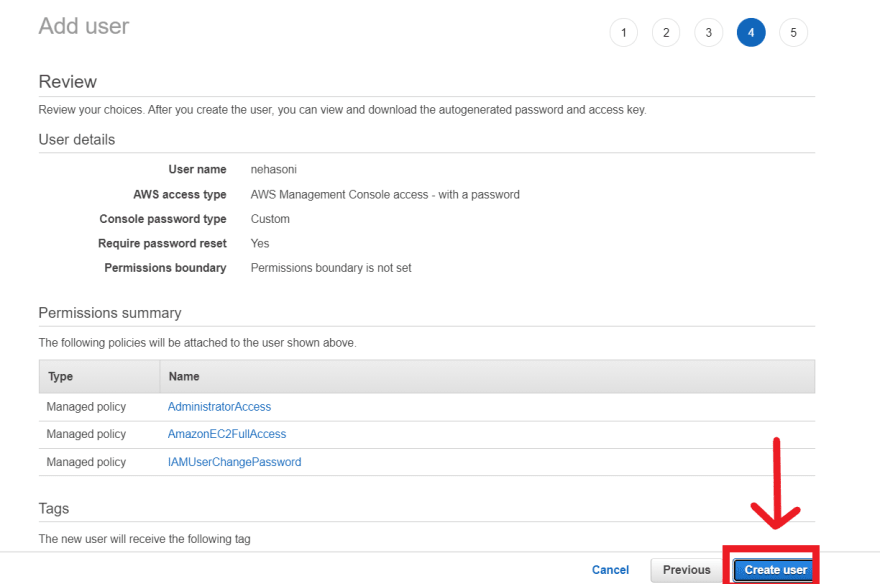
  1. Review the details of the new user to ensure everything is correct.
  2. Click the "Create user" button.

Step 7: Provide Sign-In Information to the New User

  1. After the user is created, you will see a confirmation page with a link to the AWS Management Console for the new user, along with the username and password.
  2. Copy or download the credentials for the new user and share them securely with the user.

Step 8: Sign in as the New Admin User

  1. Use the sign-in URL provided (typically in the format https://Your-AWS-Account-ID.signin.aws.amazon.com/console).
  2. Enter the new user credentials to sign in as the AdminUser.
  3. If you required a password reset, the user will be prompted to set a new password.

Step 9: Enable Multi-Factor Authentication (MFA) for the New Admin User (Optional but Recommended)

  1. While signed in as the new AdminUser, navigate to the IAM dashboard.
  2. In the left sidebar, select “Users.”
  3. Click on the new admin user’s name to open their details.
  4. Select the “Security credentials” tab.
  5. In the “Multi-factor authentication (MFA)” section, click “Assign MFA device.”
  6. Follow the steps to enable MFA using a virtual MFA device (e.g., an authenticator app like Google Authenticator or Authy).

Summary

By following these steps, you have created a new IAM user with administrative privileges. This practice enhances security by minimizing the use of the root account for daily operations. Always enable MFA for additional security.

AWS Access Methods: A Comprehensive Guide


AWS Access Methods: A Comprehensive Guide

AWS provides multiple ways to access and interact with its services, each suited to different use cases and security requirements. Here are the primary ways to access AWS:

1. AWS Management Console

The AWS Management Console is a web-based interface for managing and interacting with your AWS resources.

Use Cases:

  • Graphical Management: Ideal for visual management and configuration of AWS services.
  • Quick Configuration: Suitable for quick setups and modifications.
  • Monitoring: Good for real-time monitoring and management of AWS services.

Accessing the Console:

2. AWS Command Line Interface (CLI)

The AWS CLI is a unified tool to manage your AWS services from the command line.

Use Cases:

  • Automation: Suitable for scripting and automating AWS tasks.
  • Batch Processing: Useful for performing bulk operations.

Installing the CLI:

Configuring the CLI:

sh
aws configure

You will be prompted to enter:

  • Access Key ID
  • Secret Access Key
  • Default region name
  • Default output format

Example Command:

sh
aws s3 ls

This command lists all S3 buckets in your account.

3. AWS SDKs

AWS SDKs (Software Development Kits) provide APIs for various programming languages to interact with AWS services programmatically.

Use Cases:

  • Application Development: Ideal for integrating AWS services into your applications.
  • Custom Solutions: Suitable for developing custom solutions using AWS services.

Supported Languages:

  • JavaScript (Node.js and browser)
  • Python (Boto3)
  • Java
  • C#
  • PHP
  • Ruby
  • Go
  • And more

Example (Python Boto3):

python
import boto3 # Create an S3 client s3 = boto3.client('s3') # List buckets response = s3.list_buckets() for bucket in response['Buckets']: print(bucket['Name'])

4. AWS CloudFormation

AWS CloudFormation allows you to define and provision AWS infrastructure as code using JSON or YAML templates.

Use Cases:

  • Infrastructure as Code (IaC): Ideal for automating the setup and deployment of AWS resources.
  • Repeatable Deployments: Useful for creating consistent environments across multiple deployments.

Example Template (YAML):

yaml
Resources: MyBucket: Type: 'AWS::S3::Bucket' Properties: BucketName: 'my-bucket'

5. AWS CloudShell

AWS CloudShell is a browser-based shell that provides instant access to the AWS CLI from within the AWS Management Console.

Use Cases:

  • Immediate CLI Access: Useful for quick CLI access without local installation.
  • Secure Environment: Provides a secure environment with pre-installed tools and session management.

Accessing CloudShell:

  • Open the AWS Management Console.
  • Click the CloudShell icon on the top navigation bar.

6. AWS Systems Manager Session Manager

AWS Systems Manager Session Manager allows you to manage your Amazon EC2 instances through an interactive, browser-based shell or the AWS CLI.

Use Cases:

  • Instance Management: Ideal for securely managing and troubleshooting EC2 instances.
  • No SSH Required: Useful for accessing instances without the need for SSH access or managing key pairs.

Starting a Session:

  • Open the AWS Management Console.
  • Navigate to Systems Manager > Session Manager.
  • Start a new session with the desired EC2 instance.

7. AWS Identity and Access Management (IAM) Roles and Policies

IAM roles and policies provide a way to securely access AWS services without using long-term credentials. Instead, they use temporary security credentials.

Use Cases:

  • Cross-Account Access: Ideal for granting permissions to resources in other AWS accounts.
  • Service Access: Suitable for allowing AWS services (like EC2, Lambda) to access other AWS services securely.

Example IAM Role for EC2:

json
{ "Version": "2012-10-17", "Statement": [ { "Effect": "Allow", "Principal": { "Service": "ec2.amazonaws.com" }, "Action": "sts:AssumeRole" } ] }

Summary

AWS provides various access methods tailored to different needs, including graphical interfaces, command-line tools, SDKs for programming languages, infrastructure as code, and more. Each method has its own use cases and best practices, allowing you to choose the right tool for your specific requirements and security considerations.

How to Create an Admin User in AWS from the Root Account


How to Create an Admin User in AWS from the Root Account

Creating an admin user in AWS from the root account involves several steps. The root account has unrestricted access, so it's a best practice to create an IAM user with administrative privileges and use that account for everyday tasks, reserving the root account for account and service management.

Here’s a step-by-step guide to creating an admin user:

Step 1: Sign in to the AWS Management Console as the Root User

  1. Go to the AWS Management Console.
  2. Sign in with your root account credentials (email and password).

Step 2: Navigate to the IAM Service

  1. In the AWS Management Console, on the top right, click on your account name.
  2. In the dropdown menu, select “Security credentials.”
  3. In the left sidebar, click on “Users” under the “Access management” section.

Step 3: Create a New User

  1. Click the "Add user" button.
  2. Enter a user name for the new user. For example, "AdminUser."
  3. Select the checkbox for “AWS Management Console access” to enable console access for the user.
  4. Choose the “Custom password” option and enter a strong password. Optionally, select “Require password reset” for the user to reset their password upon first sign-in.

Step 4: Set Permissions for the New User

  1. On the “Set permissions” page, select “Attach existing policies directly.”
  2. In the search box, type “AdministratorAccess.”
  3. Check the box next to “AdministratorAccess” to assign full administrative permissions to the new user.
  4. Click the "Next: Tags" button.

Step 5: Add Tags (Optional)

  1. You can add tags to organize and manage your AWS resources. For example, you can add a tag with the key "Department" and the value "IT."
  2. Click the "Next: Review" button.

Step 6: Review and Create the User

  1. Review the details of the new user to ensure everything is correct.
  2. Click the "Create user" button.

Step 7: Provide Sign-In Information to the New User

  1. After the user is created, you will see a confirmation page with a link to the AWS Management Console for the new user, along with the username and password.
  2. Copy or download the credentials for the new user and share them securely with the user.

Step 8: Sign in as the New Admin User

  1. Use the sign-in URL provided (typically in the format https://Your-AWS-Account-ID.signin.aws.amazon.com/console).
  2. Enter the new user credentials to sign in as the AdminUser.
  3. If you required a password reset, the user will be prompted to set a new password.

Step 9: Enable Multi-Factor Authentication (MFA) for the New Admin User (Optional but Recommended)

  1. While signed in as the new AdminUser, navigate to the IAM dashboard.
  2. In the left sidebar, select “Users.”
  3. Click on the new admin user’s name to open their details.
  4. Select the “Security credentials” tab.
  5. In the “Multi-factor authentication (MFA)” section, click “Assign MFA device.”
  6. Follow the steps to enable MFA using a virtual MFA device (e.g., an authenticator app like Google Authenticator or Authy).

Summary

By following these steps, you have created a new IAM user with administrative privileges. This practice enhances security by minimizing the use of the root account for daily operations. Always enable MFA for additional security.

Preparing for AWS IAM Interview: Common Questions and Answers


Preparing for AWS IAM Interview: Common Questions and Answers

Preparing for an AWS interview often involves understanding IAM (Identity and Access Management) users, roles, and policies. Below are some common interview questions along with detailed answers:

Questions and Answers

1. What is an IAM user in AWS?

Answer:
An IAM user is an entity that you create in AWS to represent a person or service that interacts with AWS resources. Each user has a unique name and credentials, which can be used to sign in to AWS services.

2. What is an IAM role in AWS, and how is it different from an IAM user?

Answer:
An IAM role is an AWS identity with specific permissions that can be assumed by any entity that needs them, such as an IAM user, application, or service. Unlike an IAM user, an IAM role does not have long-term credentials; instead, it provides temporary security credentials. IAM roles are used to grant access to AWS resources without sharing long-term credentials.

3. Can you explain how an IAM policy works?

Answer:
An IAM policy is a JSON document that defines permissions. Policies specify allowed or denied actions on AWS resources and can be attached to users, groups, or roles. A policy typically includes:

  • Version: The policy language version.
  • Statement: One or more individual permission statements, each containing:
    • Effect: Allow or Deny.
    • Action: The list of actions (e.g., s3:ListBucket).
    • Resource: The resources to which the actions apply (e.g., a specific S3 bucket).
    • Condition (optional): Additional restrictions.

4. What are the types of IAM policies?

Answer:
There are two main types of IAM policies:

  • Managed Policies: Standalone policies that can be attached to multiple users, groups, or roles. AWS provides a set of managed policies for common use cases, or you can create customer managed policies.
  • Inline Policies: Policies that you create and manage directly within a single user, group, or role. Inline policies are tightly coupled with the identity they're associated with.

5. How can you grant an external user access to your AWS resources?

Answer:
To grant external users access to AWS resources, you can use IAM roles with a trust policy that specifies the external accounts or federated users (e.g., from an identity provider like Google or Active Directory) allowed to assume the role. This way, external users receive temporary security credentials with the necessary permissions.

6. What is the principle of least privilege, and how is it applied in IAM?

Answer:
The principle of least privilege is a security concept that dictates granting only the minimal level of access necessary for users to perform their tasks. In IAM, this is applied by:

  • Creating specific roles and policies with precise permissions.
  • Regularly reviewing and updating permissions.
  • Avoiding the use of overly broad permissions and managed policies unless necessary.
  • Using IAM groups to manage permissions efficiently.

7. What is an AssumeRole policy, and when would you use it?

Answer:
An AssumeRole policy (trust policy) defines which entities (users, accounts, or services) are allowed to assume a role. This is used when you want to grant temporary access to AWS resources to other AWS accounts, services, or federated users. For example, you might use AssumeRole policies to allow an EC2 instance to access an S3 bucket or to enable cross-account access.

8. How can you audit IAM policies to ensure they are not overly permissive?

Answer:
Auditing IAM policies involves:

  • Reviewing policies for overly broad permissions (e.g., * actions or resources).
  • Using AWS IAM Access Analyzer to identify policies that grant access to external entities.
  • Implementing AWS CloudTrail to log and monitor API calls for unusual or unauthorized activities.
  • Regularly reviewing IAM roles and policies, ensuring they follow the principle of least privilege.

9. What are the best practices for managing IAM users and roles in AWS?

Answer:
Best practices include:

  • Enforcing multi-factor authentication (MFA) for users.
  • Using roles instead of long-term credentials for applications and services.
  • Applying the principle of least privilege.
  • Regularly reviewing and rotating credentials.
  • Organizing users into groups to manage permissions efficiently.
  • Monitoring and auditing IAM activities using AWS CloudTrail and IAM Access Analyzer.

Summary

Understanding IAM users, roles, and policies is crucial for securing AWS environments. Preparing answers to these common interview questions can help demonstrate your knowledge and readiness to manage AWS resources securely and efficiently.

AWS IAM Identities: Users, User Groups and IAM Roles


IAM Identities: Users, User Groups and IAM Roles

Amazon Web Services(AWS) is a secure cloud services platform that offers a broad set of cloud-based products. It provides high-level security to data at a low cost to its users. There are many types of security services in AWS but Identity and Access Management(IAM) is one of the most widely used. So in this blog post, we will learn about IAM and also learn how to create IAM users, groups, and roles.

🤔What is IAM?

IAM stands for Identity and Access Management. It enables you to manage access to AWS services and resources in a very secure manner. It is used to set users, permissions, and roles. With the help of the IAM service, an organization can create multiple users, each with its own credentials and the user is only able to access the services that are assigned to him/her. IAM is a feature of your AWS account offered at no additional charge.

🤔Why do we need IAM?

By default, the root account user has access to all resources for all AWS services.

⏩ Now what is a root user or account, how it is different from IAM users?
A root account is an account through which you have signed up providing your card and billing details. IAM user accounts are user accounts that you can create for individual services offered by AWS.

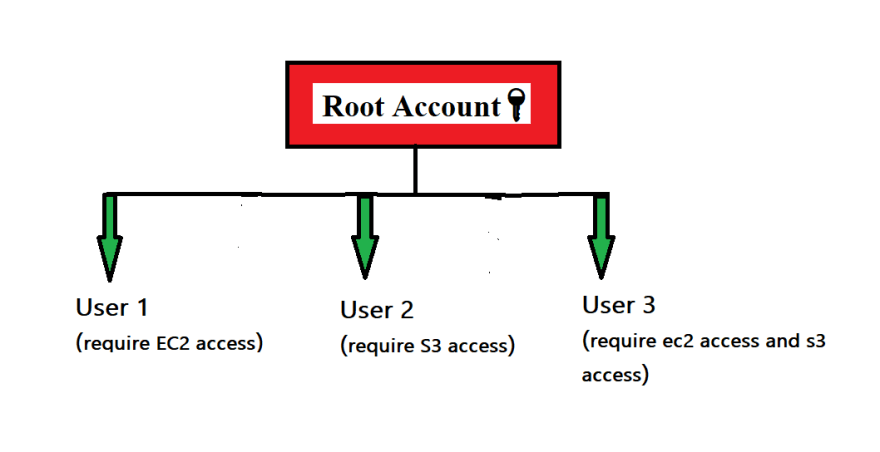
Assume that you are the head of an organization and there is a team of 10 persons in your organization that work on some projects and deploying them in AWS.
You obviously don't want to give your root account credentials to your developers or DevOps and ask them to deploy apps. So, the main purpose of IAM is to manage AWS user identities. IAM is used to control who is authentication(signed in) and authorized(has permission) to use resources and services.

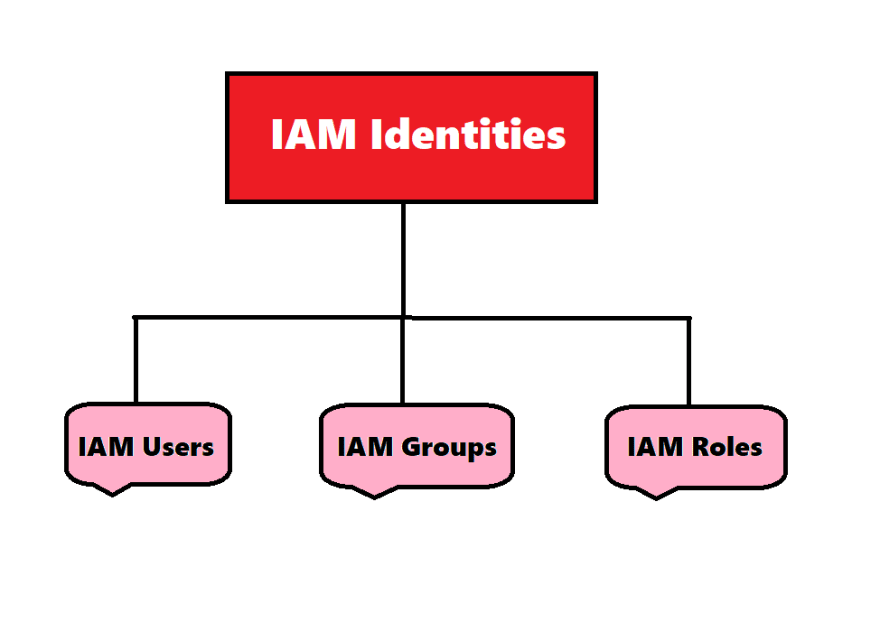
🤔 IAM Identities

iam.png
An IAM identity represents a user, user groups and roles, and can be authenticated and then authorized to perform actions in AWS. IAM identity can be associated with one or more policies.
🧐Policies is an object that, when associated with a user or user groups or roles, defines their permissions.

🧐 IAM Users

AWS IAM User is an entity that you create in the AWS account to represent the person that uses it to interact with AWS. It allows the account holder (user) to execute certain tasks in AWS. A user is made up of a name, password for the AWS Management Console and access keys to use with the API or CLI.
iam.png

🧐 IAM User groups

The User group is a collection of IAM users. It let you to assign permissions for multiple users, which can make it easier to manage the permissions for those users. So, the users that require the same permissions can be grouped together. A user group can contain many users, and these users can also belong to multiple user groups. Changes made to a group are reflected to all users within that group.
iam.png

🧐 IAM Roles

"An IAM role is an IAM identity that you can create in your account that has specific permissions." It is not uniquely associated with a single person; it can be used by anyone who needs it. A role does not have any security credential l, i.e., username password or security key. It can be used to grant access to the AWS resources, services IAM users, third parties, federated Users etc.

🤔How to create an IAM user?

You can create one or more IAM users in your AWS account. Follow these simple steps to create an IAM user:
Step 1:- Open your favorite browser and navigate to AWS Login Page
Screenshot (416).png
Then enter in your password and click submit. You have now successfully signed in to the AWS Management Console.

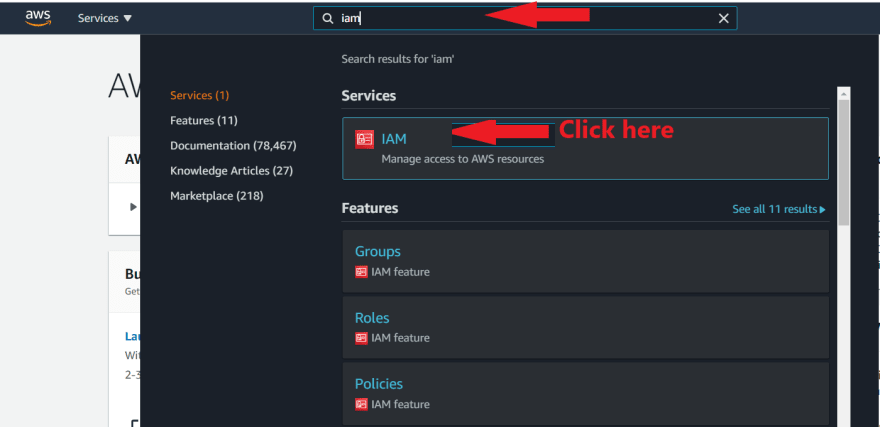
Step 2:- In the search bar type IAM and click on IAM(Manage access to AWS resources) to navigate to IAM Dashboard.
Screenshot (417).png
Step 3:- On the left side of the page, you should see an option called Users.
Screenshot (418).png
Click on that option, and you will be taken to the Users Page.
Step 4:- Click on Add user button to create a user.
Screenshot (419).png
Step 5:- Enter a username that can be used to log in later.

  • Access type
    When creating a user, you must choose between the following access types:
    a.) Programmatic access: If the IAM user needs to make API calls, use the AWS CLI or the Tools for Windows PowerShell then choose Programmatic access.
    b.) AWS Management Console access: If the user needs to access the AWS Management Console, create a password for the use.
    For now I will go with the second option i.e., AWS Management Console access

  • Console Password
    For Console password, choose one of the following:
    Autogenerated password:- Each user will get the autogenerated password that meets the account password policy.
    Custom password:- Each user will get the password you type in the textbox. Make sure your password meets the password policy.

  • Require password reset:- By using this option users are forced to change their password the first time they sign in. It is not mandatory to use this option but recommended one for best practices.
    Screenshot (420).png
    After completing all the required steps click on the Next: Permissions button.

Step 6:- Now you need to set permissions for your users. Choose one of the following three options:
a.) Add user to the group:- If you have created any group and you want to add your user to the specific group you can choose this option. You can select one or more existing groups.
If you don't know how to create the group don't worry I will discuss it later.
b.) Copy permissions from existing user:- Choose this option to copy all the existing permissions boundaries and policies from an existing user to the new user.
c.) Attach existing policies directly:- AWS has a list of a large number of policies. Select the policies that you want to attach to the new users. You can also create your own custom policy.
Click here to know how to create custom policies
Screenshot (421).png
For now, I am going to use the third option i.e Attach existing policies directly.
After setting the permissions click on the Next: Tags button.

Step 7:- Tags come in handy when we need to find a certain person in a huge group. This is a totally optional step you can skip it if you want.
Screenshot (422).png
Now, Click on the Next: Review button.

Step 8:- On this page you will see all of the choices you made up to this point.
After reviewing all the options click on the Create User button.
Screenshot (423).png
Congratulations you have created an IAM user. To save the access keys, choose Download .csv and then save the file to a safe location.

Screenshot (424)_LI.jpg

How to Login as an IAM user?

Step 1:- Copy the link and use it to login in an incognito mode as an IAM User.
iam usr.jpeg
Step 2:- Enter the username and password and click sign in.
And you can see that you can access EC2 as you've provided the permission while creating that user.

🤔IAM User Groups

We've discussed what is an IAM User and how to create an IAM User. Let's learn how to create IAM user groups and how to add users to groups.
Step 1:- Open your favorite browser and navigate to AWS Login Page
Screenshot (416).png
Then enter in your password and click submit. You have now successfully signed in to the AWS Management Console.

Step 2:- In the search bar type IAM and click on IAM(Manage access to AWS resources) to navigate to IAM Dashboard.
Screenshot (417).png

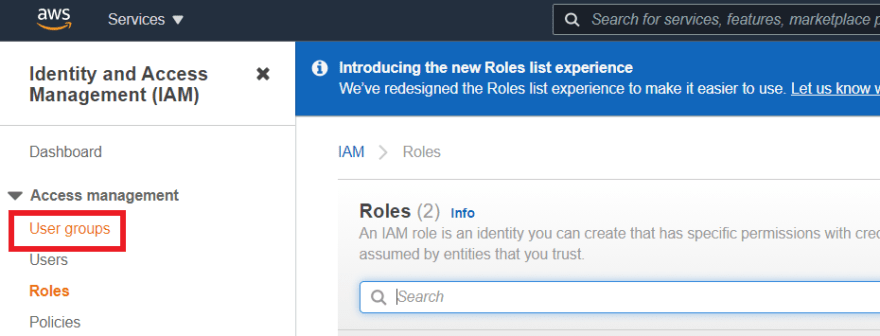
Step 3:- On the left side of the page, you should see an option called Users groups.
Screenshot (450).png
Click on that option, and you will be taken to the Users groups Page

Step 4:- Click on Create group button to create a new group.
Screenshot (451).png

Step 5:-
⚫ Provide a Group name
⚫ Select the Users who needed to be a part of the group.
⚫ Provide any permissions from existing policies

Screenshot (452).png
Screenshot (453).png
Scroll down and click on Create group button.

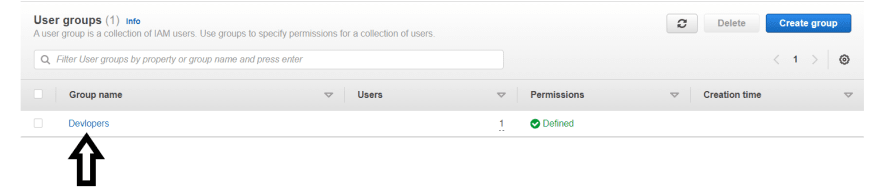
Congratulations you have created an IAM User group🤩🤩
Screenshot (454).png

🤔How to create IAM roles for a service?

Step 1:- Sign in to AWS Management Console. In the search bar type IAM and click on IAM(Manage access to AWS resources) to navigate to IAM Dashboard.

Step 2:- On the left side of the page, you should see an option called Users groups.
Screenshot (472).png
Step 3:-Click on Create role button to create a new role.
Screenshot (473).png
Step 4:- Choose the AWS service that you want to use with the role.
Screenshot (474).png
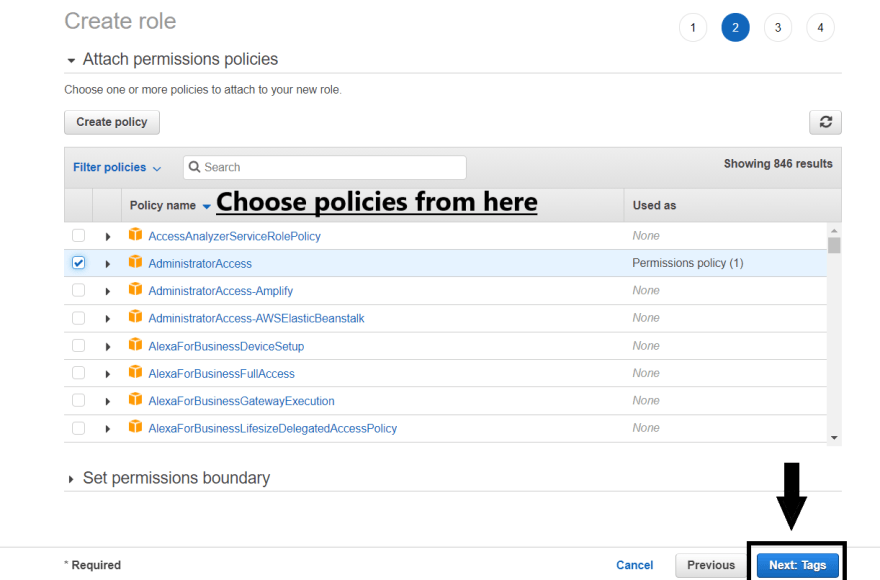
Step 5:- Provide any permissions from existing policies or you can also attach custom policies.
Screenshot (475).png
After attaching policies click on the Next: Tags button.
Step 6:- Add tags if you want and click on Next:Review button.
Screenshot (477).png
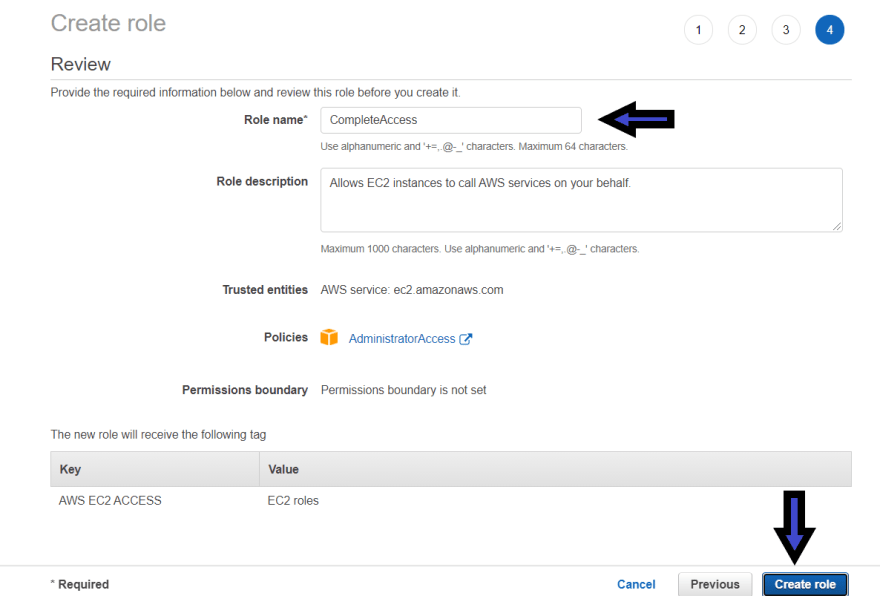
Step 8:- In a role name box, enter the role name. After completing all the required steps click on Create role button.
Screenshot (476).png
Congratulations you have created an IAM role🤩🤩.

Now how to attach it to any AWS service🤔😬

Let's attach it to AWS EC2 instance:-

Step 1:- First create an AWS EC2 instance.
If you don't know how to create an EC2 instance, I recommend you to checkout this article once -> How to create an AWS EC2 instance?
Screenshot (484).png
Select the “EC2 Instance” as we did by selecting our “Testing Instance“,
Step 2:- Click on “Actions” button and from the “drop-down menu” go to the “Security” again a new menu will be shown, from there look for “Modify IAM Role“, and select it.
Screenshot (485).png
Step 3:- Select the IAM role from the drop-down options and then hit Save button.
Screenshot (486).png
To confirm the IAM role attachment, select you EC2 instance and check the security tab, you will see the IAM role has been successfully attached.
Screenshot (487).png

That's it!

Congrats🥳🥳🥳

clap.gif

I hope you learned a lot from it and if you love my work do one favor- Please do Like♥,share and comment🙈🙈
Let me know in the comment section if you have any doubts.